How To Boost Your E-Commerce Traffic With Baidu’s MediaGo
About MediaGo
MediaGo is an advertising network which belongs to Chinese information technology (IT) company named Baidu. On 8th of July 2020 Baidu created MediaGo platform to help advertisers reach customers in the United States through high standard premium placements on multiple MSN properties. MSN (Microsoft Network) is Microsoft’s web portal which provides different types of Internet services like news, weather, entertainment, sports etc. This collaboration made possible to advertisers secure the placements that fit their goals and budget on MSN’s desktop site, rather than requiring advertisers to purchase bulk inventory like many other digital ad companies do. So if you want to target US audience from established source, MediaGo is the way to go.
Advantages and disadvantages of MediaGo
Here are some features you are going to face using this ad network, which can play in your advantage or disadvantage. The first one that is worth considering is that the maximum number of symbols allowed in the title is eighty, so brevity is important as always.
Another cool thing about it, is that there is a customized schedule allows to specify weekdays or even time period of a given day.
You are allowed to upload up to three images in one single campaign, and they can be similar, so MediaGo will adjust images to required size by itself. You may also want to combine the same image with different titles to test effectiveness for future adjustments and improvements which is also supported. But according to the Ad policy of MSN, text on the picture is not allowed, so pay close attention to that.
The ad reviews usually take 8-16 hours, but in some cases it could last up to 24 hours. So the review time is relatively fast and it is their advantage. However if you do make some modifications to your ad campaign after starting it, they could review it manually only if your modifications not about creatives (title, landing page, brand name and image). In other cases the system will review the campaign automatically.
You can not target the audience which are use specific browser versions, what can be seen as a disadvantage when it comes to target very subtle kind of ad viewers, but targeting the audience with different types of browsers is present.

The metrics of algorithm used to optimize ads is based on CTR(Click-Trough Rate) and traffic will be preferentially provided to advertisements with higher CTR. But they tell that their algorithm is constantly being updated and will be optimized based on more metrics, such as conversion.

The payments are available via transfer payment, PayPal or credit card. When it comes to data monitoring, the data can not be displayed in real-time, there is a delay within four hours. But all the data displayed is accurate.
How to get started
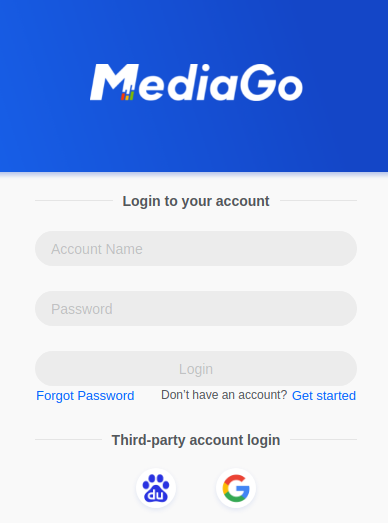
First of all, you need to set up your MediaGo account. The process is common and pretty straightforward. Click on a register button on top-right corner of the website that leads on “Sign up an Ad account” page.
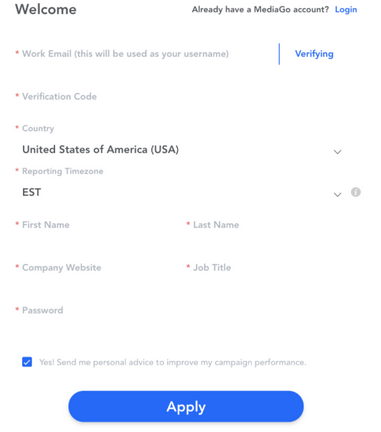
Enter all the required information and the system will send a verification code on your email you provided in the application. After completing verification, you will be able to use your account user name and password to login into MediaGo.
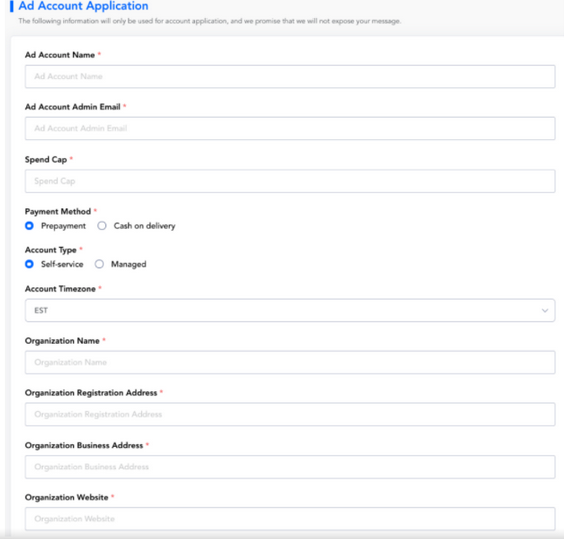
Then, you need to fill up the forms for your ad account. In the Ad Account Name field, you need to choose your company name or its subsidiary/secondary brand name. In the Spend Cap, you need to enter the total amount of money(US Dollars) you would like to spend. Billing methods are either prepayment or cash on delivery. If you want to pay after starting campaign, choose cash on delivery option. If you would like to launch a campaign by yourself, you need to select Self-service in the Account Type menu. In another case, select Managed, it means that you will have a manager who will help you. It makes sense only with big budget.
After finishing that, you can login to MediaGo Dashboard.
Organizing your MediaGo account
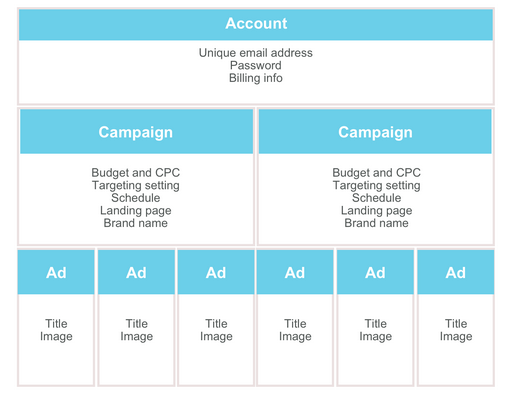
Before creating your first campaign it is important to understand MediaGo organization. Here accounts are organized in three main layers, which are: Ad Account, Campaign and Ad.
- Ad account: The account is related to your unique address, password and your payment information. Your account can consist of one or more campaigns.
- Campaign: Your campaign can consist of up to three ads and this is the place where you set your budget, CPC (The amount you pay for each click on one of your campaign items), campaign schedule, the audience you would like to target, landing page as well as your brand name.
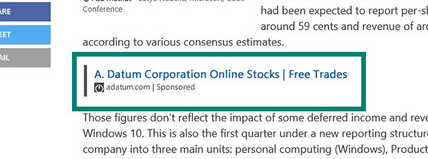
- Ad: The ad is what users see on MediaGo placings and each ad consists of the title, which could be a slogan to promote your product or company in order to attract clients’ attention. And an image that you set to appear above the title.
Here is the picture of how it looks like
Starting your first campaign
Before setting your campaign take your time and think about your goals i.e., the audience you want to reach out, the budget you would like to spend and CPC. Planning in advance can help you save a lot of time and money.
Creating your first campaign
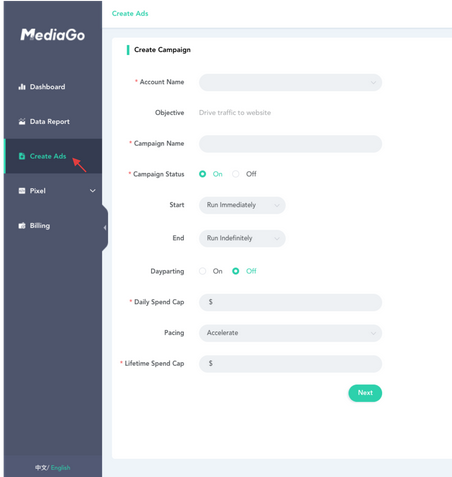
First, you need to click on Create Ads option on the left side of your MediaGo cabinet. Where you need to fill in some details like: Campaign Name – it is recommended to use the format: date + product name + feature + targeting. For example: “June_2021_Get_Better_Cosmetics_teens”. Campaign Status, it is and “On/Off” option in order launch or stop the campaign. You can leave Start/End options by default so the campaign runs immediately and indefinitely. You can customize it later to your preferences. In the Dayparting option by selecting “On”, you can customize the days and hours you would like your campaign to be active.

Daily Spend Cap: here you need to set the daily amount you would like to spend. The minimum daily limit couldn’t be less than 20 USD a day. In the Pacing there are two options: Standard and Accelerated. Standard means that your campaign will pace as evenly as possible throughout the period you specified. Accelerated means that your campaign will consume its budget as quickly as possible.
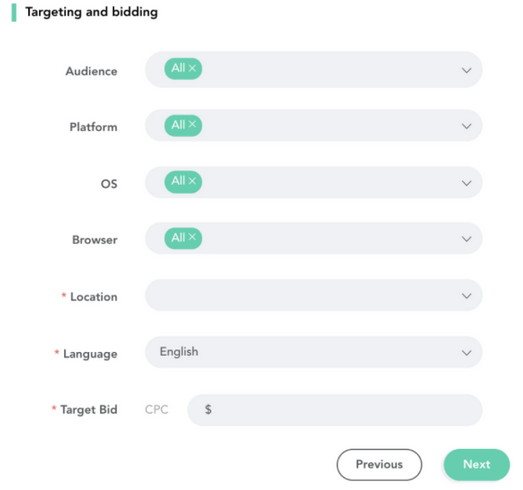
After clicking “Next” button you have to deal with Targeting and biding settings. Where you need to specify Audience you want to target, Platform users use, Location with including or excluding State or Zip code and Language which is limited to English and Spanish.
On the Target Bid option you need to specify CPC (Cost Per Click) which is the cost you will pay each time when the user clicks on your campaign’s ad.
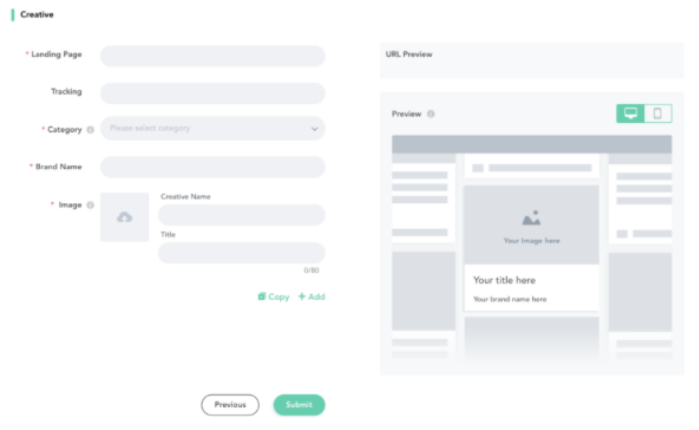
And finally, you need to set up your Creative page to set the creatives of your ads. On Landing Page specify the destination of your URL when users click on your campaign’s ad. Tracking is where you can add URL parameters to the destination URLs of your campaign items. In the Category option – select the type of your product to tell our system what your ads are about. The Brand Name is the text that will appear under your campaign’s title and image. The image size cannot exceed 1Mb, keep that in mind. The Ad Asset Name is automatically generated by the system to help advertisers to distinguish a specific ad among all ad assets. However, it can be changed at your convenience. The title of your campaign is the text which can have the maximum amount of symbols limited to eighty. After completing the form click “Submit” to launch your campaign.