How to configure Analytics via Google Tag Manager

Configure web Analytics: why it matters
Proper configuration of web Analytics in online advertising important to evaluate and improve the effectiveness of campaigns.
Simply put, thanks to a properly configured web Analytics we:
- find out what sources bring you more conversions.
- -we optimize ad campaigns (switchable low-quality traffic sources);-
- decisions about budgeting, advertising channels;-
- improve site conversion;-
- reduce the cost of customer acquisition.
It is desirable to connect Analytics to advertising systems in which you launch a campaign. This is necessary not only in order to obtain the most complete and current data, but in order to effectively tune the remarketing.
How to configure web Analytics
There are two ways to configure web Analytics.
The first is a complex. You need to put on the site Yandex.Metrics, Google Analytics remarketing codes advertising systems (Facebook Pixel, the pixel Vkontakte, counter Top.Mail), as well as calltracking (if lid is call).
Then to configure the delivery of event, conversion and goals. To configure the sending events in the advertising and analytical systems often requires knowledge of JavaScript, CSS and principles of work with libraries of type of JQuery.
And if there will be new events and goals or a new website, all of these actions will have to be done again.
The second is easier: use Google tag Manager (Google Tag Manager, GTM). With no need to constantly change the code once to put the container with the tags on the website. If there are new events you can add them inside GTM. But if you change your website, the container with all the settings you just move.
What is Google Tag Manager
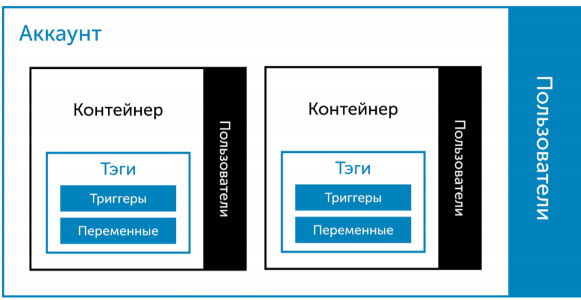
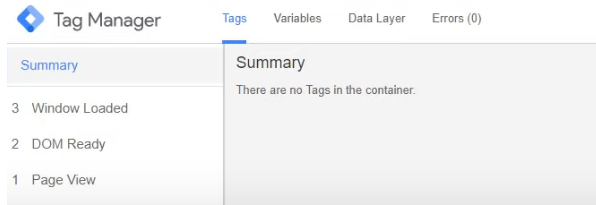
Google Tag Manager is a control system tags.
The main entities within GTM is a container, tag, trigger, and variable.
The container is a repository of tags and triggers. Contains counters that are triggered under certain conditions and take into account the actions of users on the site. The container is placed on the site once; after that, you can control the counter to change settings, remove or add new counters, not making edits to the website code.
A tag is the action that executes the GTM (activation of Google Analytics or Yandex.Metrics, sending an event conversion, etc.).
A trigger is the event that triggers the tag (a user is viewing a certain page on the website, click on the button, etc.).
Variables allow you to run the tags or trigger (when the trigger value matches a variable) and record actions or changes on the pag.
Google Tag Manager will suit you if:
- it is necessary to establish systems analysts (their codes);-
- install codes services calltracking or online chat and other services;-
- need to send events and record conversions in multiple systems analysts;
- you have a online store and need to set up e-commerce Analytics;
- you don’t have a web programmer, you are setting all by yourself and want to make it easy and convenient.
What else can you do with GTM: - to replace the content on the website (static calltracking, substitution of headings, images);
- to check broken links;
- to send a user id into the Analytics system;
- track abandoned forms.
How to install PC system Analytics through Google Tag Manager
A preparatory stage. How to create a Google Tag Manager and put it on the website
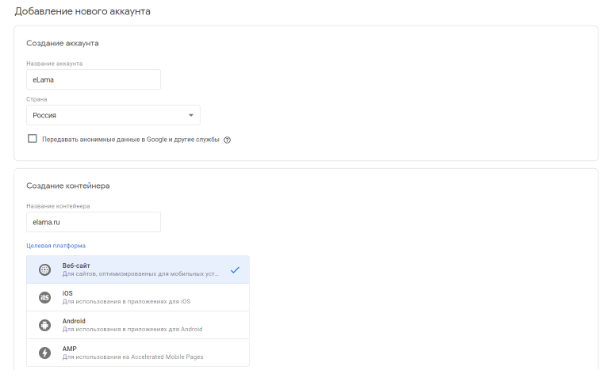
To create an account in Google Tag Manager, you need a Google account (in other words, the mail on Gmail). After it is created (or if it already is) go to tagmanager.google.com and click “Create account”.
If done correctly, a popup window will appear “Install Google tag Manager”.
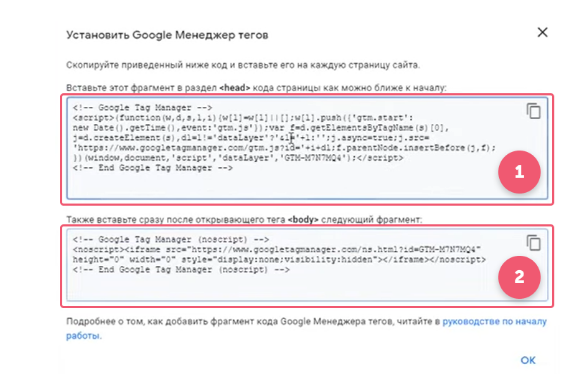
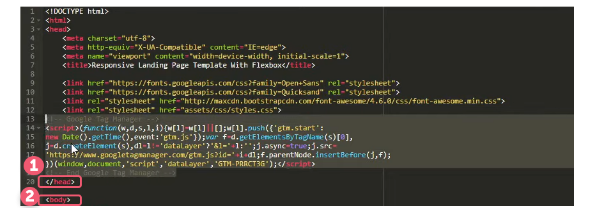
Copy the code from the first field. It must be put before the closing tag in your website code. (Depending on the particular site this can be done through the file type index.html to use the plugin or to integrate GTM directly.) The code from the second box is put after the opening tag .
Then you need to check whether GTM on the website. You can use the preview or the Google Tag Assistant extension.

On the website have been uploaded yet iframe-form.
After this you can install Google Analytics, Yandex.Metrics Facebook and other Pixel counters.
Install Google Analytics via Google Tag Manager
Install Google Analytics easiest: it has a direct integration with GTM.
In the left menu, open the section “Tags”, click “Create”.
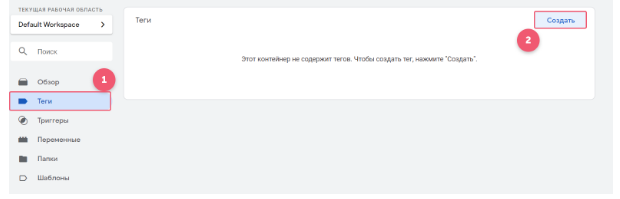
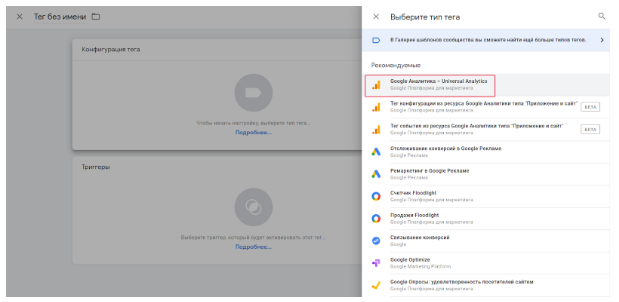
A window will open with two fields: “Configuration tag” (the action to be performed) and “Triggers” (conditions).
In the “Triggers” select the option “All Pages” (then Google Analytics will be activated every time the user browses any page of the site).
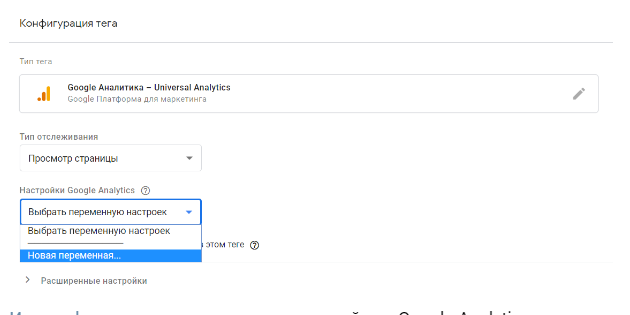
In the “Configuration tag”, select “Google Analytics — Universal Analytics”.
In the “tracking Type” automatically put down option “Pageviews”.
In the “Analytics Settings” you need to insert the ID. In the drop-down menu, select “New variable”.
The tracking ID can be found in Google Analytics: “Admin”, — “Resource” “resource Settings”.
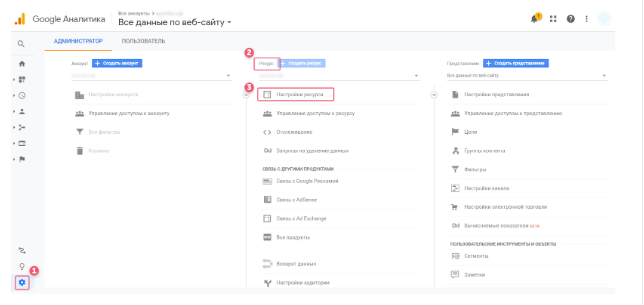
In the “Basic settings” you’ll see “tracking ID”.
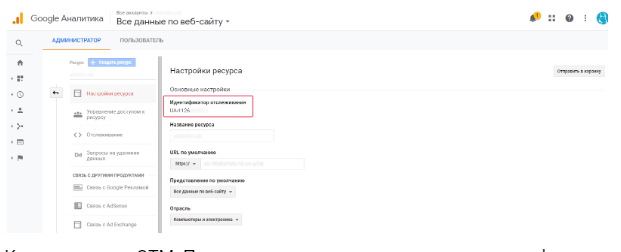
Copy it to GTM. Variable named the same as the tracking ID (not to be confused). Save the tag. After that it will appear in the workspace.
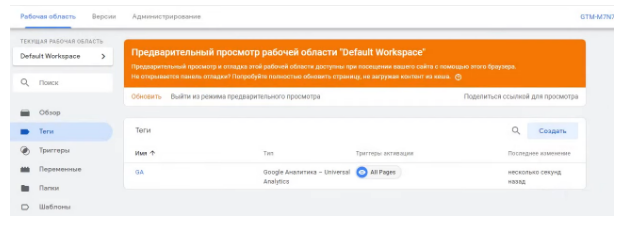
To changes in the container appeared on the website, click on the “Send” button (upper right corner). Set the “version Name” and click “Publish”.
Then you need to check the correctness of the tag: use the preview mode. If everything is correct, the tag will be displayed in iframe form.
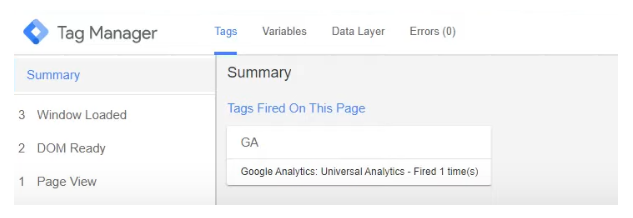
Also, the correct operation can be checked through Google Tag Assistant or Google Analytics (tab “a real-time Report”).
To Install Yandex.Metrics using Google Tag Manager
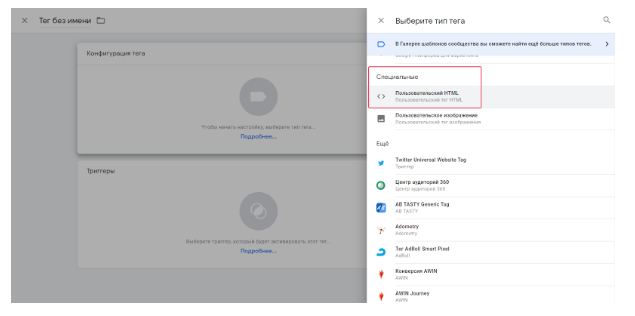
Create a new tag (see “Tags” in the left menu, the “Create” button). The trigger is set the same as in the case of Google Analytics, the “All Pages”. In the “tag Configuration”, select: “Special” — Custom HTML.
In the input field HTML code to insert Yandex.Metrics. To do this, go to your account and select the counter. In the left menu, click “setup”. Will appear below the “Code counter”.
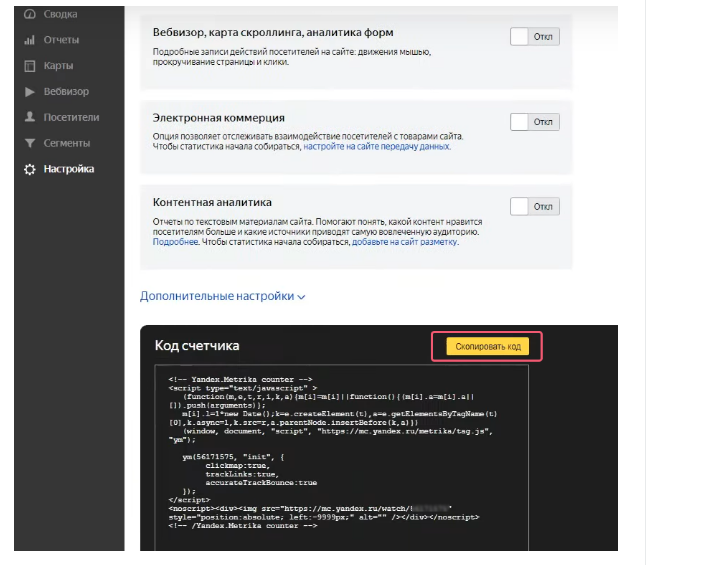
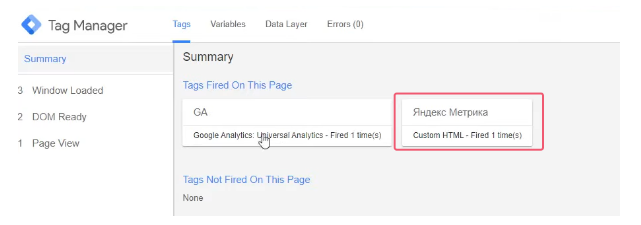
Copied HTML code into the appropriate box in Google Tag Manager and click “Save”. The tag will appear in the workspace. It should be “Send” to check the correct operation.
Also the correct installation can be checked with parameter ?_ym_debug=1. It must be put immediately after the URL of the website.
While on the website, open the code (Ctrl+Shift+I) and look for a parameter PageView. Counter. After it is the number of counter — check that it matches with the number inside your account in the Yandex.Metric.
Install Facebook Pixel Google Tag Manager
First you need to create a Facebook Pixel (at eLama is a step by step instructional video on how to create and customize a Facebook pixel). To do this, go to Ads Manager and Events Manager tab, select “Pixels”.
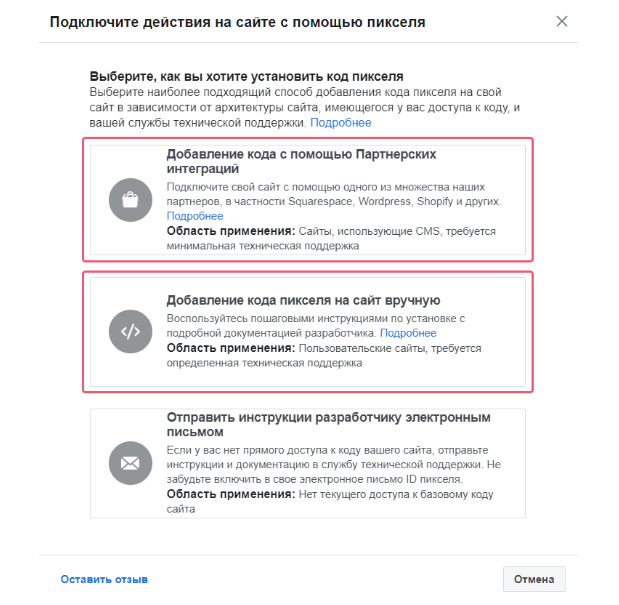
To add the Facebook pixel in the GTM in two ways: through partner integrations or manually.
When installing manually pixel the algorithm is the same as in the case of Yandex.Metric: create a tag in configurations, select “Special” — “Custom HTML” and copy the code.
If the added pixel with the assistance of partner integrations, enough of the list to find the Google Tag Manager.
Then you will need to select Gmail, which is tied to the GTM, the GTM account and container and “close configuration”.
In the workspace GTM should be a pixel tag Facebook.
To verify the installation you can also preview (iframe-form) or via the Facebook Pixel Helper extension (for Google Chrome).
Configure events
The choice of events depends on the structure of the website and how to build a funnel of user interaction. Most often you need to track:
- sunset on a particular page;
- pressing the button (for example, a visitor filled out the form: left contact details and pressed “Send”);
- the visibility of a particular element (e.g., a banner with the special offer);
- the depth of the scroll (there is a corresponding trigger type).
- Further analyze in detail how to set up the event for clicking the button.
- Custom events in Google Analytics
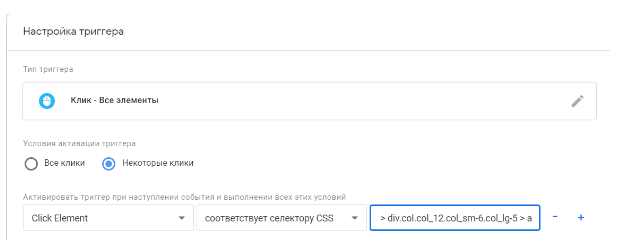
- Create a new tag. However, unlike the previous circuits, as the trigger did not choose “All Pages” and create a new trigger.
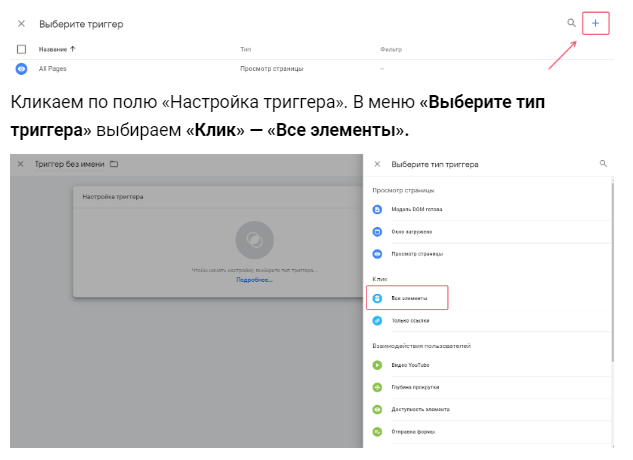
Set “Condition is triggered” — “Some clicks”.In the first field in the drop down menu click “Select a built-in variable”. In the menu, Click select Element. In the second field, select the condition “matches CSS selector”.
Where can I find this selector? Go to the website and find the element clicking on which GTM needs to forward the event. Simply put, button.
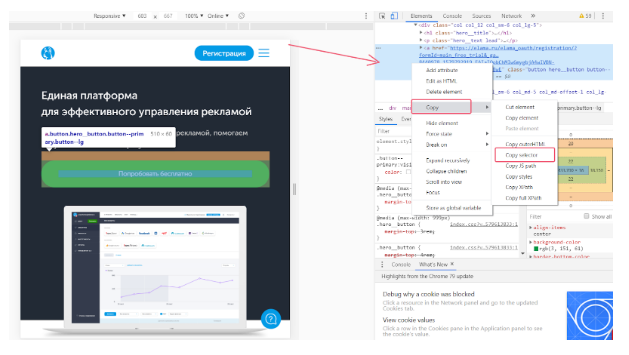
Click on it, right-click, select “View code”.
In the right part of the screen a box appears with the code page; the code of the button will be highlighted. Click on this highlighted field, right-click, select “Copy” — “Copy selector”.
Insert the selector in the last field in the “trigger setup” in GTM.
Call trigger, for example, “Click on the button” and save it.
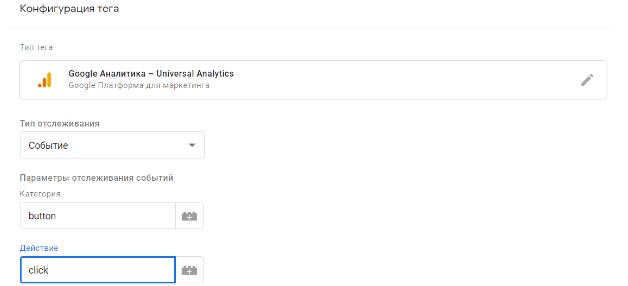
Next, fill the box “Configuration tag”. Select “Google Analytics — Universal Analytics”, the tracking type “Event”. In the menu need to be sure to fill out the two fields “Category” and “Action”. For example, the “Category” is a button and “Action” — click.
The tag is called, for example, “GA — Click on the button”.
In “Google Analytics”, select the account ID in Google Analytics. Then when you click on the button in the analytic system will be sent to event category button and click action.
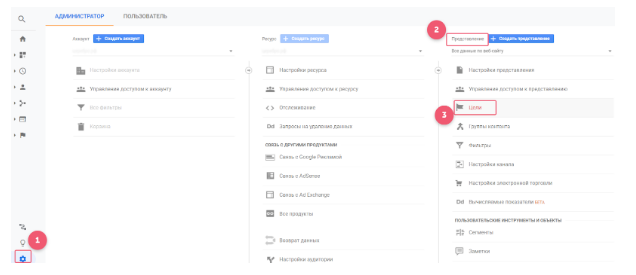
Go to Google Analytics and create a corresponding target (“Admin” — “View” — “Purposes”).
In the “goal Setting”, select “Private”. Give it a name (e.g. “Click the button”) referred to the Type “Event”. Fill in the “details about the destination”: “Category” — button, Action — click. Maintain the conversion in Google Analytics.
Go to GTM and save the tag “GA — Click on the button”. Published, check the.
Configure events to Yandex.The metric
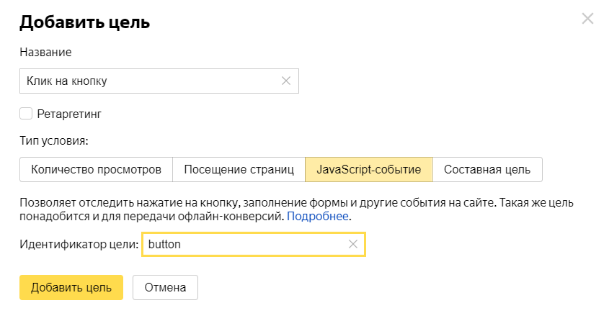
First you need to create a goal in Yandex.Metric (“setting” — “Objective” — “Add goal”). Give it a name (e.g. “Click the button”). In the field “condition Type” choose “JavaScript-event” in the “ID target” input such as a button.
Go to Google Tag Manager and create a tag with the trigger “Click click” and configuration “Custom HTML”. Write the submit event in Yandex.metric:
where instead of units — the ID of the account in Yandex.The metric, instead of ‘event ID’ — the ID that is specified in the description of your goal (in our case button).
Call the tag “Metric — Click on the button”. Persistent sent in the final version of your container, check.