Vkontakte targeted advertising
Today we’ll get to the bottom of how to best set up targeted ads in Vkontakte (VK), talk about different ad formats, and the peculiarities of setting up an ad account on this platform.
How to set up a targeted ad campaign in VK?
First steps
- Start with figuring out who your client is. What goals do they pursue? What are their needs? But finding answers to these questions you can draw up an accurate portrait of your target audience (TA). Google Analytics, Yandex.Metrika and other web analytical services are here to assist you in this task.
- Decide whether you’ll drive traffic to a website or attract new users directly to your VK
- Draw up your ad budget. It is important to note that it should consist of two parts: the test launch budget and the main campaign (AC) budget. Testing ads is a necessary measure to understand what segment of your audience and which creatives and texts rake in the most profit.
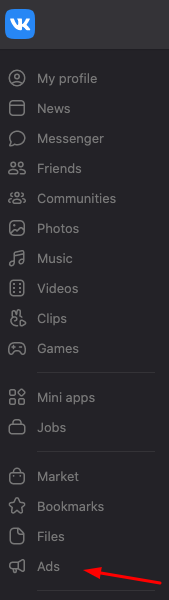
How to access your VK ad account?
In order to access your VK ad account, click on the “Ads” button at the bottom of the left block of the page.
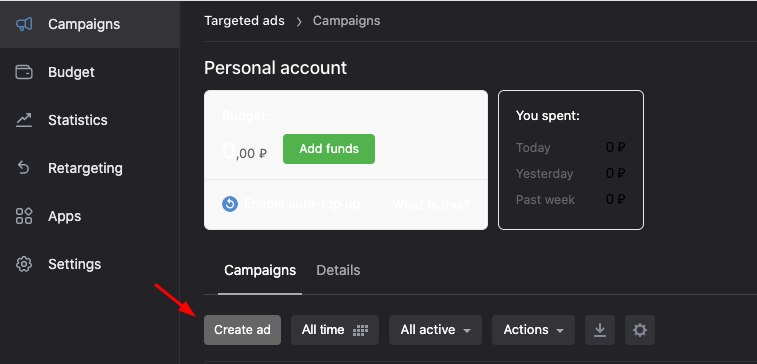
Next, click “Create ad”
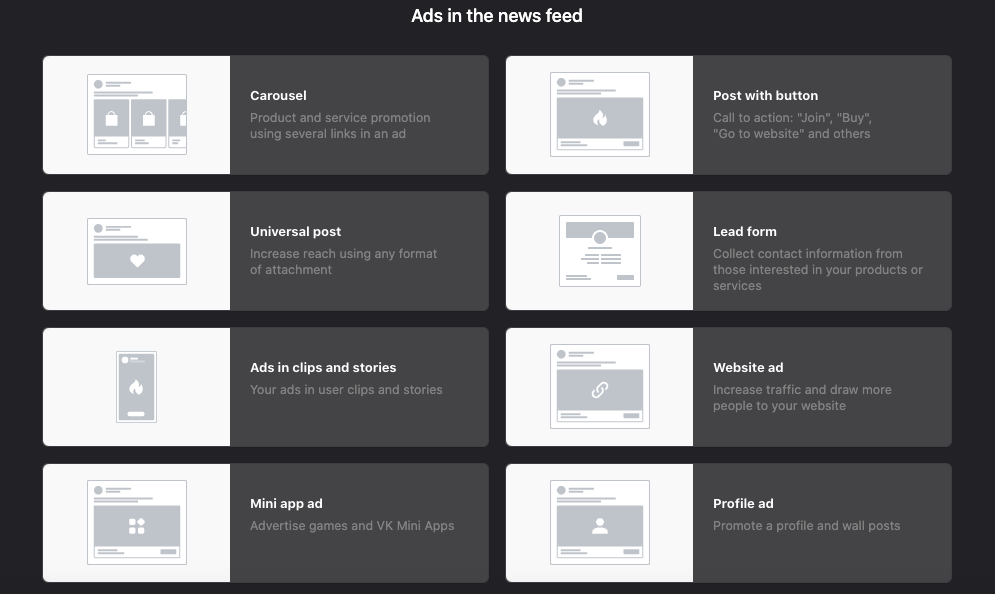
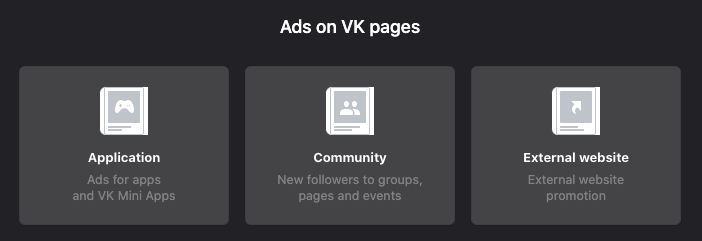
- Now, you’re offered to select an ad format.
- Ad formats.
- VK ads are subdivided into desktop and cross-device.
- The latter includes ads that are displayed on tablets, smartphones, and computers.
Desktop ads include ads that are only displayed to computer users.
Let’s go over the most popular ad formats in VK
- Carousel. This ad type can house from 3 to 10 photocards. And each card has a title, price (optional), and link. This ad format is best suited for promoting a lineup of goods/services of the same tenor.
- Post with button. The format includes text and a picture with a button under it (the call to action) that leads to a VK group or a foreign online resource. A great way to increase the conversion rate.
- Universal post. With this option, the advertiser can attach various media files to their ad: from sound clips to surveys. For example, an excellent option to promote musical releases.
- Website ads. Perfect for attracting traffic to your landing page. This format makes it impossible to promote and webpage housed on the vk.com domain. In order to evaluate the quality and effectiveness of such ads, use UTM links that let you track the users who came to your website from VK.
- Ads in stories. A format that allows you to upload to the appropriate section up 3 ad stories containing a link to a VK group or foreign website.
- Desktop ads. Consists of a headline, description, and 145×85 ppx image.
Setting up the ad format
After you have chosen an ad format, it’s time to move on to fiddling with the targeted ad parameters and setting up the AC.
Let’s go over the setup procedure using the “Post with button” format as an example. After clicking this button, you will immediately be offered to choose or use an existing post as an advertisement or create a new one. Promote existing posts only when you’ve done all the tests and know for sure what audience converts best.
When A/B testing text-creative bundles for various segments of your TA create new ads instead of using existing ones.
Ok, so we’ve decided to make a new ad. First of all, we need to add a link to the landing page or VK community we want the traffic to go to. The place users will be redirected to after clicking the button.
Write a selling text to be displayed above the link and image.
Rules for making a “Post with button” ad:
- Description – up to 220 characters with spaces and punctuation marks and no more than 6 emojis. And no more than 2 line breaks. No links or hashtags in the text.
- The image or video size can’t be less than 537×240 pixels (16:9). Any text on the image mustn’t take up more than 50% of the space.
- The title may contain up to 80 characters with spaces and punctuation marks.
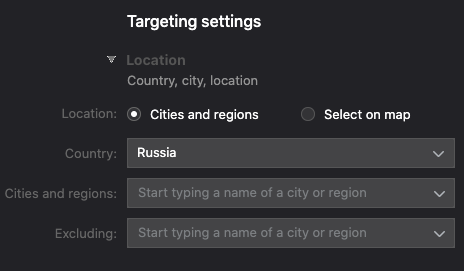
Setting up the TA
- GEO. If your product/service can only be purchased offline – indicate your city. In most other cases, it’s best to indicate the country. The “except” field is designed to make sure your ads won’t be displayed to people from specific places. In the “neighborhoods”, “streets” (and similar) fields, you can specify parts of the city but keep in mind that such a decision will significantly narrow down your audience. And the narrower the audience, the more expensive it is.
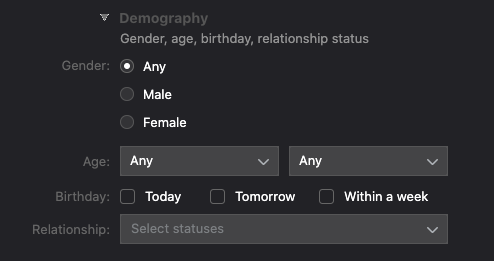
- Demography. Specify the age and gender of your potential buyers. But remember that not all users fill out these fields in their profiles, which means you run the risk of ignoring a potential customer when configuring age settings. This section also allows you to configure the “Birthday” and “Marital status” setting, which are used by most specialists to promote event agencies, photographers, stylists.
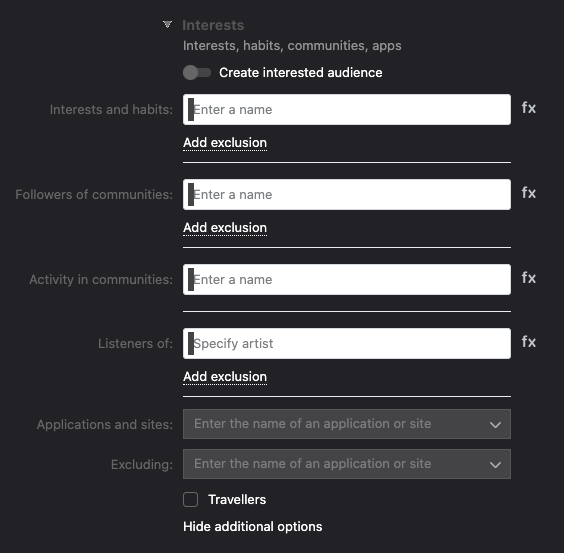
- Interests. In this section, In this block, you can specify certain user preferences based on the portrait of your TA. Among other things, there is a convenient “Community subscribers” function, that allows you to target users that are subscribed to specific VK groups. The “Activity in the community” feature allows you to focus on users that repost content or leave likes/comments in other groups. , The “Listens to musicians” tab is a must-do if you’re promoting musicians or musical releases. Configuring “Applications and websites” allows you to target people that use specific VK applications.
- Key phrases. This block helps to find a specific audience by isolating its most important characteristics that can be described in 2-3 words.

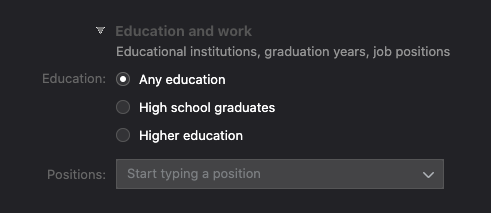
- Education and work. You can specify the audience’s level of education, the name of the educational institution, and their position (at work).
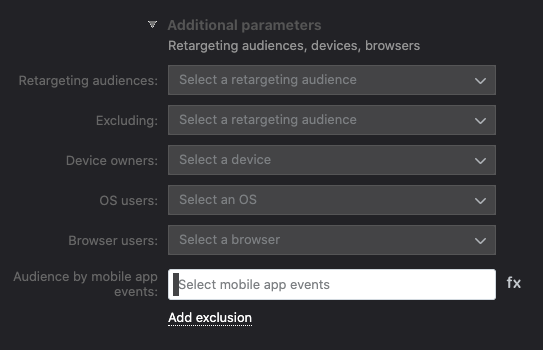
- Retargeting. A useful section to target users who in one way or another have already interacted with your brand/product. Retargeting allows you to return such users for repeated conversions and an increase in sales. Another feature of this block is to upload lists of your TA that you can compile through special services called parsers.
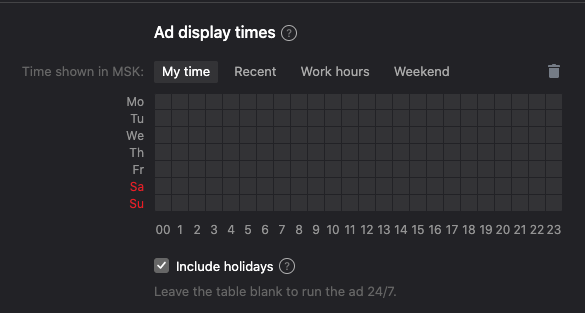
- Ad display time. This feature allows for your ads to be displayed at a specific time period. For example, if you’re engaged in food delivery services and you work from 10:00 to 19:00, there’s no point in showing the user ads outside this time interval. You’d just be wasting money.
- Setting up the price and display.
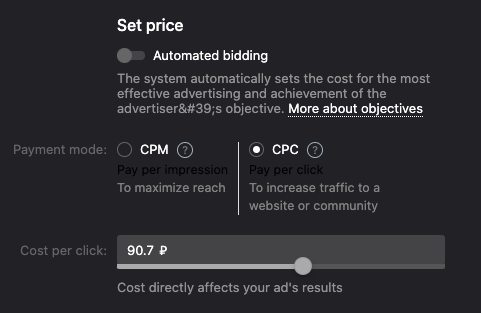
Specify the desired method of payment. Currently, you can choose between paying for impressions or redirects. We recommend choosing the first option when conducting tests, then switching to the second when you’re ready to launch your AC.
Set limits for how often a single user is shown the ad. This is an important point, because, first, the more a specific person sees the ad, the more likely they are to get annoyed and irritated with it. Second, by showing your ads to the same people, you risk ignoring potential clients from another segment of your TA. So, opt for 3-5 impressions per person.
Your ad is ready to undergo moderation!
Conclusion
The targeted ad market is evolving daily. Learn, look for insights, keep up with the news – this is the only way to achieve success in this niche. Don’t give up if at first, you don’t succeed. It all comes with experience.